First off, I just wanted to say that the orange couch has grown on me. I don’t know if it was the overwhelming positive response or the time I’ve spent getting used to seeing its Cheetoh self every day. Regardless, it’s staying for now. And we decided to snazz it up a bit more.

We tufted the pillows! Right?! I love it!!! It gives it a more finished look. At least we think it does. I keep forgetting you guys are dumb. Anyway, it was pretty dang easy to do. I’ll walk you through it:

1 - You’ll need buttons (which I made using a button kit and fabric dyed with the same dye as the slipcover), scissors, a long needle (like an upholstery needle) and thread. I ended up using embroidery floss because the upholstery thread seemed pretty flimsy. Okay, I tried it and it broke. I may have pulled too hard (see step 8).
2 - Mark (on both sides) where you want the buttons. I had Ryan do this part. I am TERRIBLE at measuring. I feel like I’m a measure twice, cut once kind of person, but I think I measure wrong both times. It never seems to turn out right. Ryan wanted me to say that it helped him a lot to use pins to get the measurements perfect before marking with a pen/chalk/pencil/whatever you use. See, I wouldn’t have thought of that and there would have been black dots everywhere…
3 - Run one piece of thread through the button, then BOTH ends of the thread through the needle. I tied a loose knot so that the thread wouldn’t come undone when I pulled it through the pillow.
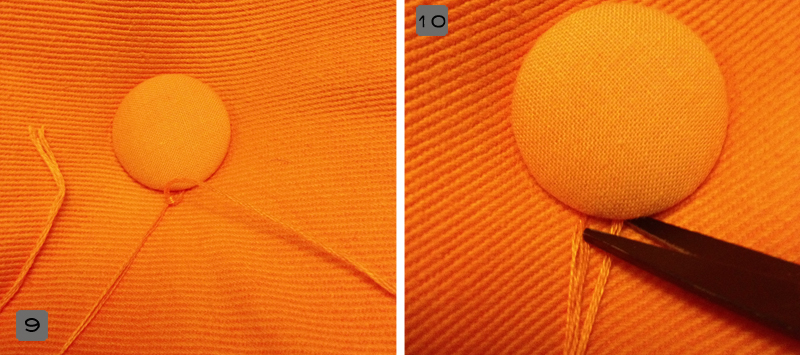
4 - Insert the needle where you marked and go straight back to the corresponding mark on the other side of the pillow.

5 - Pull the needle through the outside. This. Was. Very. Hard. For me at least. I thought my arm was going to break trying to ram that needle through. If I ever do this again, I’m going to get a longer needle.
6 - Untie the knot on the needle, insert one end of thread into the button back and pull a little on that strand so that it’s longer than the other. Create a slipknot by making a loop (like you’re tying a knot) in the longer strand, but don’t pull the knot tight.
7 - Insert the short strand into the loop and tighten. Pull on the short strand to start the tufting.
8 - Once you get to the depth you want (don’t pull too much or your thread will break - believe me), tie a regular knot and pull it tight.
9 - I tied a few knots just in case.
10 - Clip the thread. Make sure it’s under the button so that you won’t see it, but not too short so that you accidentally clip the threads holding the buttons on. You don’t want to have to start the process over again. Remember, it wasn’t easy getting that dang needle through.
Voila! That’s it! Doesn’t it look so much more structured and mid-century? Me lovey!!! Of course, Ted went and immediately started biting on one of the buttons. Ryan told them that it’s because of them that we can’t have nice things.

Pin It


15 Comments
You’re my hero.
What a great idea to go from comfy/shlumpy (my couch looks shlumpy unless I fluff the pillows and don’t sit on) to mid-century chic! LOVE IT!
Also, colorful couches FTW, ours is a big, snuggly cranberry :)
HA! Don’t sit on it… I will say that the tufting really helped the slouchiness. A lot.
your sofa is gorgeous!!!! I’m sooooooo inspired by your dharma dyeing post and the tufting post. I’ve got all the ingredients except the dye and the needle.
I’m curious as to what size buttons did you use? I got size 30 (3/4″), and hoping to get the same effect that you accomplished.
I’m uber nervous about the dyeing part. streaky dye and patchy fabric are haunting my DIY dreams! any tips for the anxious dyer?
First of all, THANKS SO MUCH!
Now back to business… I bought size 45 buttons (Dritz Craft Cover Button Kit, Size 45
http://amzn.com/B0051EP7DK) and upholstery needles (Dritz 9021 Upholstery Needle, 4-Pack
http://amzn.com/B0009V2PZS). The longest needle is perfection.
As far as streaky dyeing…I wish I could put your mind at ease. The best advice I could give is to follow the directions to the letter. And let me know how it turns out!
I’ve been stalking your Cheeto couch job for weeks- we are going for silver grey idye and I love the tufting!!! I am absolutely going to attempt this.
We do have a washer and have washed our white-er, dirty white- slip cover a number of times I’m just worried that the idye will dye all future loads.
Great blog- thanks!!
Oooh! Silver grey sounds pretty!!! I’m sure your washer will be fine. I’d just run a few rinse cycles when you’re done. I hope it goes well!!!
i tried finding these $40 white ikea slipcovers you speak of, but can’t seem to locate them online. could you point me in the right direction please? btw, thanks for this tutorial, it’s awesome.
I just went on their website and…wow. They got rid of the $40 ones. Or they raised the price. I’m so sorry!
bummmmmer. ikea are jerks!
Right?! They caught on to the whole dyeing thing. Total jagweeds.
I guess this should be obvious, but since you’ve tufted the cushions, I’m guessing you can’t wash the covers anymore. Has that been a problem for you? I am obsessed with the midcentury look, but am scared of having grimy looking cushions if I can’t wash them periodically.
Thanks!
Well, since the tufting part only takes a half an hour or so, I’ve undone them, washed the covers, and retufted. I know that might sound like crazy talk, but it is what it is.
I have a dumb question!! :) when you are tufting, are you pushing the needle all the way through the cushion to the other side? Not just the cushion cover?
Sorry it took me so long to get back to you. Yep - all the way through the cushion.
Hi! How did you attach the arm to the end of the chaise. We need to do the same thing but are stuck on how best to do it. Thanks!